Sunday, December 4, 2022

Creation Station: Holiday Happenings


ETA: Oops! I missed the deadline to hook up with the blog hop due to illness. A list of the design team's projects is at the end of this post.

How can it be December already?! Does the holiday season sneak up on you every year like it does for me? First it's Halloween--did I buy candy? Then it's Thanksgiving--who's coming over? What will I be making? And then we're sliding into Christmas--what do the kids want? Have I done my Christmas cards? (Yes, they're ALL made--over 100 of them. Are they signed, sealed, and delivered? Of course not!!) 

One of the things I like to do for the holidays is make little gifts for my officemates. We all hang stockings outside our cubicles and get little goodies throughout the month of December. I thought I was done with that since I retired at the end of July--but (what was I thinking?!) I've gone back to work part-time to the same office to work on a special project. So I'm needing a few little goodies to spread the holiday cheer.

I found the perfect inspiration from Barbara Reed, the Wexford Stamper. She's my Stampin' Up sideline and she is the QUEEN of box-making. She is really and truly amazing! You should give her a follow on her blog and on You Tube.

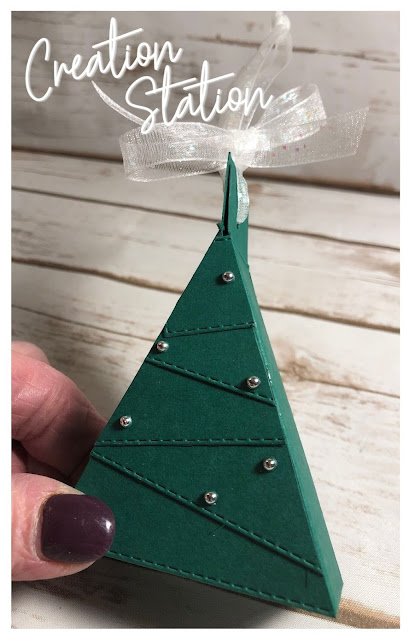
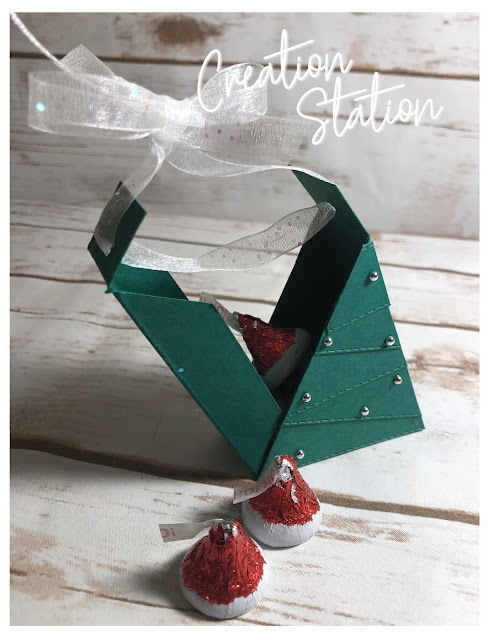
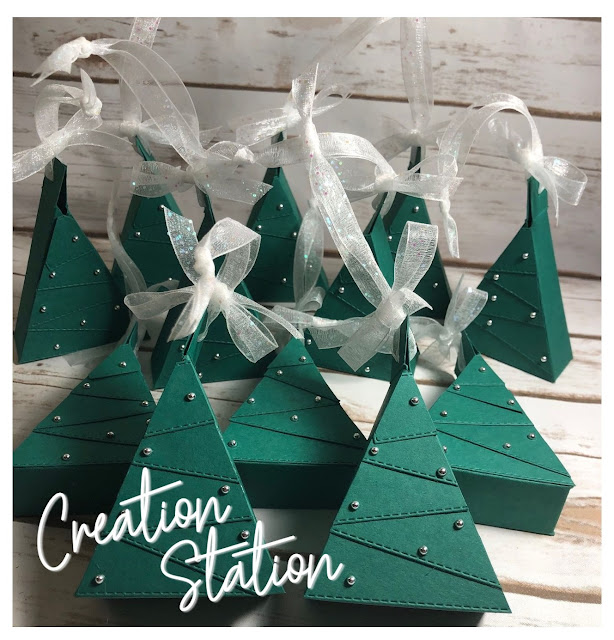
Today I present to you a forest of candy-filled Christmas tree boxes!

Aren't they just the cutest?! You can make your own by following my tutorial. I used Shaded Spruce Card Stock, Glittered Organdy Ribbon, and Festive Pearls. To make the zig-zagged stitching pieces, I used the Stitched Rectangles Dies.


Mono Multipurpose Liquid Glue is your friend for putting these together!

There's a clever secret to opening these boxes to get to the goodies inside without ripping open the box: slide the bow up the hanger and then you can open the side of the box.


Since I missed linking up with the Creation Station Design Team's blogs, I've posted their links below. You can start on any one of these blogs and hop around this month's projects.

@denitawrightsmee

@saranell7710

@seeinginkspots

@thecraftyoinkpen

@justbstamping

@thecreativeteapot

@theartfulinker

I hope you have the happiest holiday and an excellent new year! (I'm @kkstamps on Instagram)


Product List
Paper Snips
[103579]
$11.00

Christmas Tree Box Tutorial

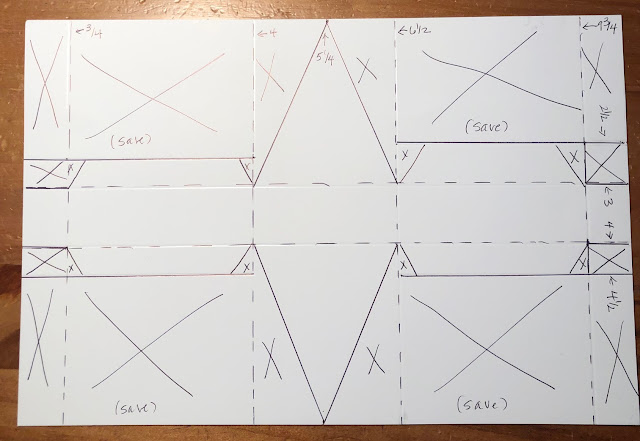
1. Cut cardstock to 10-1/2" by 7". 

2. Score the long side a 3/4", 4", 6-1/2", and 9-3/4".

3. Score the short size at 3" and 4". Score at 2-1/2" down to the second horizontal score line; score at 4-1/2" down to the second horizontal score line. Turn cardstock 180 degrees and score at 2-1/2" and 4-1/2".

4. Mark 5-1/4" inches on the long side. Use a ruler to draw a diagonal line to the score line. (See pattern)

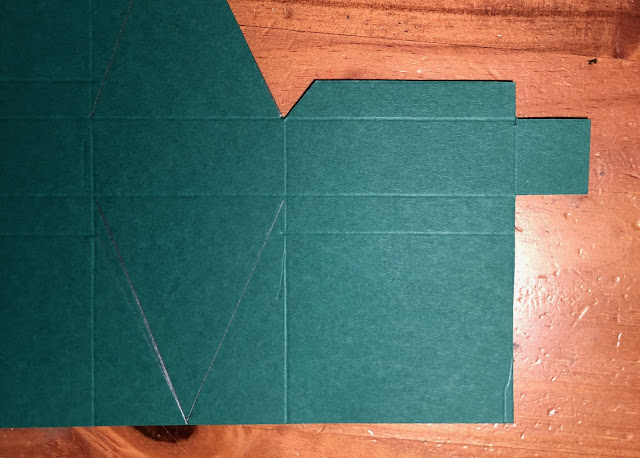
5. Cut the tabs for the box as shown.


6. Cut the box sides and tree shape as shown.


7. Cut the other four corners of the pattern, so that you have just the box parts remaining. Save the larger pieces of cardstock for a later step.


8. Use your bone folder to crease all score lines. Add liquid glue to two flap, as shown.


9. Fold the side of the box up and adhere to the sides of the tree. A bit of the flaps will extend passed the tree. Snip these off.

10. Fold the other side of the box in to form the tree. Punch a hold in the flaps at the top of the tree. This will be where you insert the ribbon hanger.


11. Cut about 12" of ribbon and thread through both holes in the flaps and tie in a knot at the top. Cut another 12" of ribbon and tie a bow around the hanger. (See sample box) The bow slides up the ribbon hanger to allow the box to be opened to retrieve the candy. The bow also helps hold the box closed.

12. Use a Stitched Rectangle Die to cut 4 rectangles from your reserved card stock pieces.


13. Use liquid glue to adhere these strips to the front of the tree in a crisscross pattern, as shown.


14. Once the glue sets a little, turn the box over and snip off the overhanging pieces.


Wednesday, November 30, 2022

Christmas Card Making Challenge: Day Thirty

And so we've come to the end of November and the end of Martin Stone's #30DayChristmasCardMakingChallenge. It's been a fun--and I'm not kidding--challenging month. I've really enjoyed working hard to meet the challenges and the deadlines. I'm pleased to say that I'm 29/30--I only missed one day. I'm pretty impressed with myself.

Our final challenge is "Wreathed in Joy" and the obvious choice for this challenge is Stampin' Up's "Cottage Wreaths" stamp set. 
I started by layering a 3-3/4" by 4" piece of Painted Christmas Designer Series Paper onto a 4" by 5-1/4" Soft Succulent Festive Foil Specialty DSP. PROTIP: I used one of the Country Wreaths Dies to cut a wreath out of the center of this for later use. Then I adhered everything to an Evening Evergreen Card Stock card base.

I used a large square Stylish Shapes Die to cut a Basic White piece and then cut a just-larger square of gold Festive Foils Specialty DSP. PROTIP: I cut the gold wreath from this and saved it for later use. I adhered the Basic White square directly to the gold foil square and then used Stampin' Dimensionals to adhere this to the card front.

I used Multipurpose Liquid Glue to adhere the reserved Soft Succulent and gold foil wreaths to the Basic White Square. 

I stamped the "Merry Christmas" sentiment from the "Cottage Wreaths" set in Versamark onto a Basic White scrap, sprinkled on gold Stampin' Emboss Powder, and set it with my Heat Tool. I cut this down to size using my Paper Snips. I cut a few Evening Evergreen leaves with the Country Wreaths Dies and adhered these to the back of the sentiment piece before adhering it to the card with Stampin' Dimensionals.

To finish the card, I made a triple bow with gold Simply Elegant Trim and adhered it to the card with a Mini Glue Dot and then I added four gold Festive Pearls.

Thank you @MartinsMayhem for an enjoyable, challenging, and creative month. You rock!!


Product List

Tuesday, November 29, 2022

Christmas Card Making Challenge: Day Twenty-Nine

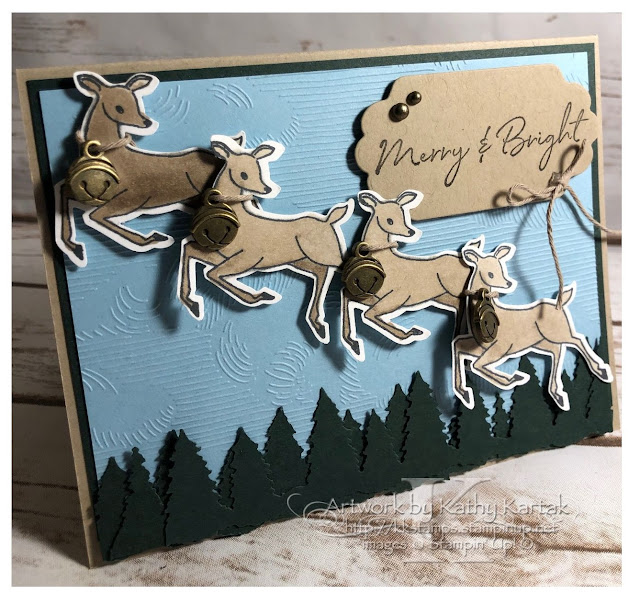
What's better than a group of flying bell-wearing reindeer to depict today's theme of "Sleigh Bells Ring"? This idea just sprung to my mind and I went with it!

I stamped the deer image from the "Peaceful Deer" stamp set four times in Memento Tuxedo Black onto Basic White Card Stock. I colored the deer with Light and Dark Crumb Cake Stampin' Blends and then punched them out with the matching Deer Builder Punch. I used Crumb Cake Baker's Twine to tie a Flat Jingle Bell Trinket around each deer's neck.

I embossed a 3-3/4" by 5" Balmy Blue Panel with the Into the Clouds Embossing folder and adhered it to a 4" by 5-1/4" Evening Evergreen mat. I adhered this to a Crumb Cake Card Stock card base. Next, I punched several rows of Evening Evergreen trees with the Evergreen Border Punch and adhered them to the bottom of the card with Mini Glue Dots, alternating them to give them some dimension.

I adhered the four deer to the card front with Stampin' Dimensionals, positioning them so they look like they're flying. 

I stamped a sentiment from the "Sweet Candy Canes" stamp set in Early Espresso Ink onto Crumb Cake Card Stock and cut it out with a Seasonal Labels Die. I adhered this to the card front with Stampin' Dimensionals. 

To finish the card, I tied a bow from the Crumb Cake Baker's Twine and adhered it to the label with a Mini Glue Dot and then I added two Rustic Metallic Adhesive-Backed Dots.

This card turned out just as I envisioned! I'm so pleased with the result!


Product List