Showing posts with label Work of Art. Show all posts

Friday, September 8, 2017

Autumn Trees Times Two

#stampinup   #faithfulinkspirations   This time of year, when summer is turning into fall, we get the most awesome sunsets.  The leaves are starting to come off the trees, but they've still got some foliage on them.  I love these crisp almost fall evenings! Occasionally, I'll see a sunset and think: "I could stamp that."

The "Lovely As A Tree" stamp set has been around for ages. Every year I think I'll pull it out and use it to stamp trees at sunset. I haven't gotten around to it until now. And I did two versions!

First I used the swoop image from the "Work of Art" stamp set and, starting from the bottom, stamped one swoop in Pear Pizzazz (stamped off once), Crushed Curry, Tangerine Tango, and Cajun Craze onto a 3-3/4" by 5" Shimmery White panel.  Then I stamped the row of trees from "Lovely As A Tree" in Basic Black Archival Ink. I added a sentiment from the "Colorful Seasons," also in Basic Black Archival Ink.

I adhered the stamped panel onto a 3-7/8" by 5-1/8" Basic Black mat and then onto a Pear Pizzazz Card Stock card base. Simple and pretty.

I thought it might be fun to try to blend the colors into each other, so I stamped them again--this time without the Cajun Craze, and then used an Aqua Painter to blend the colors into each other.
What do you think? Which version do you like better? And a special bonus question: Can you spot the mistake? Both cards have the same mistake...but I don't care because they're still awesome, if I do say so myself (and I do)!


Product List

Monday, June 26, 2017

Seeing Spots

#stampinup   #faithfulinkspirations   I haven't played with the "Work of Art" stamp set in a while because I'm always working with the newest Stampin' Up releases.  But it's always good to visit an old friend, especially one that you really enjoy.  For today's card, I paired up my old friend stamp set with a new friend, "Ribbon of Courage," and three of the amazing new In Colors!
I started with a 3-3/4" by 5" Whisper White panel. I stamped the zigzag from "Work of Art" three times--once in Powder Pink, once in Berry Burst, and once in Fresh Fig. Then I stamped the dot from the same set in the same colors randomly in the remaining white space.  I adhered this to a 3-7/8" by 5-1/8" Fresh Fig Card Stock mat, and then onto a Thick Whisper White Card Stock card base.

Next, I stamped a sentiment from the "Ribbon of Courage" set in Fresh Fig onto a Whisper White scrap.  I cut this out with one of the square framelits from the Stitched Shapes Framelit collection. I adhered this to a Fresh Fig scalloped square that I cut with the Layering Squares Framelit collection. I adhered this to the card with Stampin' Dimensionals.

This fresh design was quick and easy to pull off with some of the elements from my old friend "Work of Art." Don't forget to appreciate your old friends as you create--and be sure to introduce them to new friends. They get along so well, don't you think?


Product List

Friday, June 17, 2016

Fab & Happy Birthday

#stampinup   The sketch on the Fab Friday challenge blog had me stymied for a little bit and then I struck upon an idea that I really loved. I was so pleased when the idea in my head came out on paper!!


For my card, I started with a Thick Whisper White Card Stock base, cut lengthwise. I stamped the zigzag from the "Work of Art" stamp set in Watermelon Wonder diagonally across the card base. I stamped another zigzag in Wild Wasabi. I used my grid paper to approximately align the two segments of the lines. The "break" between the two segments of the zigzag are hidden behind the rectangular pieces.


Then I cut a piece of Whisper White card stock and another slightly larger piece of Wild Wasabi to as a a mat. I stamped a sentiment from "Watercolor Wishes" in Watermelon Wonder and added a small heart from the same set.


I tied a piece of Whisper White Thick Baker's Twine around this element before adhering it to the card with Stampin' Dimensionals. I thought the card needed a little sumthin-sumthin so I added three white sequins from the Metallics Sequins Collection, using the Fine-Tip Glue Pen.


All Images Copyright Stampin' Up

Friday, April 8, 2016

Hello Swoops


#stampinup   When I saw the code word at the Addicted to Clean and Simple--ATCAS--challenge blog, I thought, "What in the world are inlaid dies?" I really had no idea. And then I looked at the fabulous samples and knew exactly what that is. Let me see if I can explain, well, take a look at my card recipe below and I think that will explain it!

I started with a Whisper White panel and used the swoop stamp from the "Work of Art" set and stamped it three times in Calypso Coral, Melon Mambo, and Blushing Bride. (I got this idea from this card I made earlier this week). Then I used the hello die from the Thinlits Framelits collection to cut the word out of the stamped swoop. (I put that aside in my card parts pile because I can certainly use that for another card!) Next, I cut the same "hello" framelit out of a scrap of Whisper White.

I adhered the stamped panel to a Basic Black mat and then onto a Melon Mambo card base, cut lengthwise. Then--here's where the "inlaid" comes into play--I filled the negative space left in the stamped image with a light layer of glue from the Fine-Tip Glue pen and laid in the plain white "hello." Get it? 

This turned out so cute! I might try this technique again soon!


Product List

Sunday, April 3, 2016

Creation Station: Spring Flowers


#stampinup   #creationstation   We're featuring projects with a spring flowers theme for our April edition of Creation Station. I'm ready for spring--the trees in our yard are just past their peak bloom and the flowers are starting to bloom. 


Spring is such a beautiful time of year. Unfortunately, it doesn't last too long in central Maryland. It seems we have a few weeks of spring weather and then
blammo
we're well into the hot, sticky (icky) summer! So I'm going to enjoy our fleeting spring days while they last (even if we're going to get snow flurries today)!

Onto the stamping! I went a little outside my usual fare for today's projects. Instead of simply showcasing greeting cards (ain't nuthin' wrong with that), I've done two home decor projects. Let's start with the card.

I've seen this technique out in the stamping blog-o-sphere and I wanted to try my own version of it.  I stamped the swoosh from the "Work of Art" stamp set onto two Whisper White panels in Calypso Coral, Melon Mambo, and Blushing Bride. I cut one of the stamped panels with the single rose thinlit from the Rose Garden Thinlits collection. Then I used the Fine-Tip Glue Pen to adhere the cut rose to the stamped panel.

I adhered the panel to a Basic Black mat and tied on a length of Basic Black Stitched Satin Ribbon. I stamped the frame and "happy  birthday" stamps from the "Rose Wonder" stamp set in Basic Black Archival Ink onto a Whisper White scrap and cut it out with the matching Rose Garden thinlit. I adhered the label to the card with Stampin' Dimensionals and then adhered the panel to a Melon Mambo card base.

I'm loving this bold, graphic design! Here's a close up of the cut rose on the stamped swooshes. 

For my next project, I CASEd an idea from my BFF, Lynn Birus. She made the cutest little tchotchke using one of Stampin' Up's wooden blocks. I've been admiring Lynn's block for years and I finally made my own!

I added a strip of English Garden Design Series Paper to a strip of Mossy Meadow Card Stock. I wrapped this around the block, scoring the piece with my Simply Scored Board, so I would have crisp corners and so the paper would lie taut on the block. I adhered the ends with Fast Fuse Adhesive.

I stamped the sentiment from the "Perfect Pennants" set in Melon Mambo onto a 1-1/2" strip of Whisper White Card Stock. I slipped the paper into the Note Tag Punch with the end hanging out so I could have a longer tag. I punched Blushing Bride and Melon Mambo flowers with the flower punch from the Itty Bitty Accents Punch Pack and added them to the tag with Glue Dots. I punched a hole at the top of the tag with the 1/8" Circle Hand-Held Punch.

I tied a length of Blushing Bride 1/4" Cotton Ribbon around the top of the block and tied the tag to the ribbon with a length Linen Thread. For a finishing touch, I added a Basic Pearl to the center of each flower.


Here's a pic of the "before" and "after" blocks!

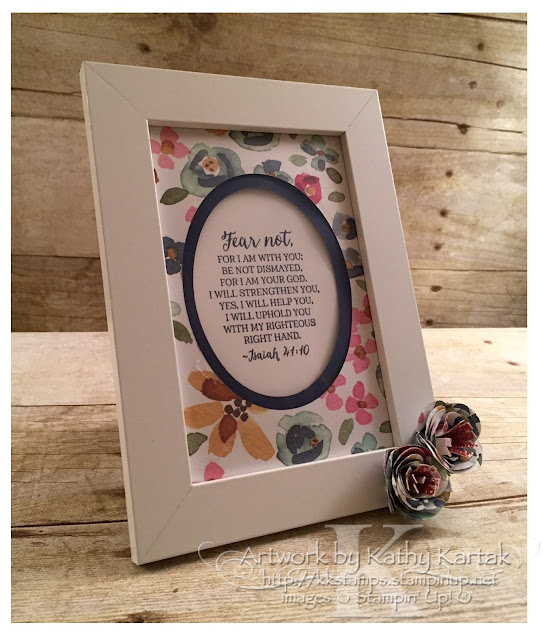
For my final project, I framed the Isaiah scripture from the "Rose Wonder" stamp set. This scripture stamp was the reason I bought this set. I love the scripture and the script! I stamped the scripture in Night of Navy onto a 4" x 6" Whisper White panel. I cut an oval using one of the Ovals Framelits Collection out of a 4" x 6" piece of Night of Navy Card Stock and a slightly larger oval out of a 4" x 6" piece of English Garden DSP. I used Stampin' Dimensionals between each layer to give some depth to the project. 


Next, I made two flowers from English Garden DSP using the Spiral Flower Originals Bigz Die. I used the Fine-Tip Glue Pen to adhere the flowers together. Then, I cut narrow strip of Blushing Bride Glimmer Paper with my Fringe Scissors, rolled that up, glimmer side in, and glued it into the center of the flowers using the Fine-Tip Glue Pen. I folded the fronds outward. I adhered the flowers to the frame with Stampin' Dimensionals.


I'm pleased with the way the frame turned out and how it showcases the scripture.

Well, those are my projects for the April Spring Flowers Creation Station blog hop. You can keep hopping around the blog by using the "next" and "back" buttons below. I know you'll be inspired by our design team--I'm always wowed and inspired by their projects!!


http://hollyshobbs.blogspot.com/2016/04/spring-flowers-with-creation-station.html
http://stampinbythesea.com/creation-station-botanical-garden


Product List

Product List

Product List