Showing posts with label Creation Station. Show all posts

Sunday, August 6, 2023

Creation Station: Ombre Blending


Hello and welcome to the August Creation Station Design Team's Ombre Blending blog hop. This month the team has created projects blending inks for an ombre effect. I can't wait to see what our amazing design team has created for us! Let's get started with my creation.


I used our Blending Brushes to apply Lemon Lolly, then Lemon Lime Twist, and finally Azure Afternoon onto a 3.75" by 5" Basic White panel. After I applied the inks, I stamped the words from the "Biggest Wish" stamp set in Memento Tuxedo Black. I love the bold black against the bright ombre colors! I adhered this to a 4" by 5.25" Basic Black mat and then used Black Stampin' Dimensionals to adhere this ti a Thick Basic White Card Stock card base.

I wanted to add some sparkle to the card--and, boy, did I ever! I added quite a few Iridescent Rhinestones and Iridescent Pastel Gems to the card. They remind me of champagne bubbles--so festive!

Next up is Vicki Boucher who is a demonstrator from Melbourne Australia and a member of Stampin' Up's Artisan Design Team. I know she will WOW you with her project!
 

The Creation Station Design Team is also having an Instagram hop. Head on over to my account @kkstamper and you can hop around the team's designs there, too. We'd love it if you'd give us a follow!

Until next time--happy stamping! 


Product List

Sunday, July 3, 2022

Creation Station: The Great Outdoors


#stampinup   #creationstation   #faithfulinkspirations

Hello and welcome to the first Sunday of July and that means a Creation Station blog hop! This time our team is featuring creations on the theme of the great outdoors.  Anyone who knows me knows that I'm not an outdoorsy kind of girl. Quite the opposite! I don't want to be out with the bugs and sticks and dirt and heat and humidity! I'll stay inside, thank you very much. But I do like to look out my window at the nature that surrounds me. God's earth is so beautiful! I'm amazed every day.

I don't own many "great outdoors" type stamp sets, so I took the opportunity of being at a stamping retreat to borrow the Grassy Grove Bundle from one of the gals at the retreat! I wasn't sure that the card I'd created over the weekend up to snuff and I almost pulled out of the hop...but I took another look and I like it. I really like it!

I cut a full sheet of Crumb Cake Card Stock in half lengthwise (hotdog style) and scored each half at 5-1/2". I cut about 1/4" off one of the long sides and both short size of one of these pieces so that it would fit when I made the double-fold card.

On the front piece I used one of the dies from the Grove Dies to cut the forest silhouette. I was working with the Hues of Happiness Designer Series Paper and I noticed that one side could be used as a golden sky and grassy ground. I stamped the meadow stamp from the "Grassy Grove" set in Granny Apple Green onto the DSP to give it a little more interest. I cut the piece to fit the inside flap of the card.

I had a strip of this DSP piece left over, so I stamped the deer from the set in Daffodil Delight Ink right onto the DSP and quickly sprinkled on Clear Embossing Powder and set it with my Heat Tool. I used Stampin' Dimensionals to position the deer in place, so that he peeks out from behind the arbor.

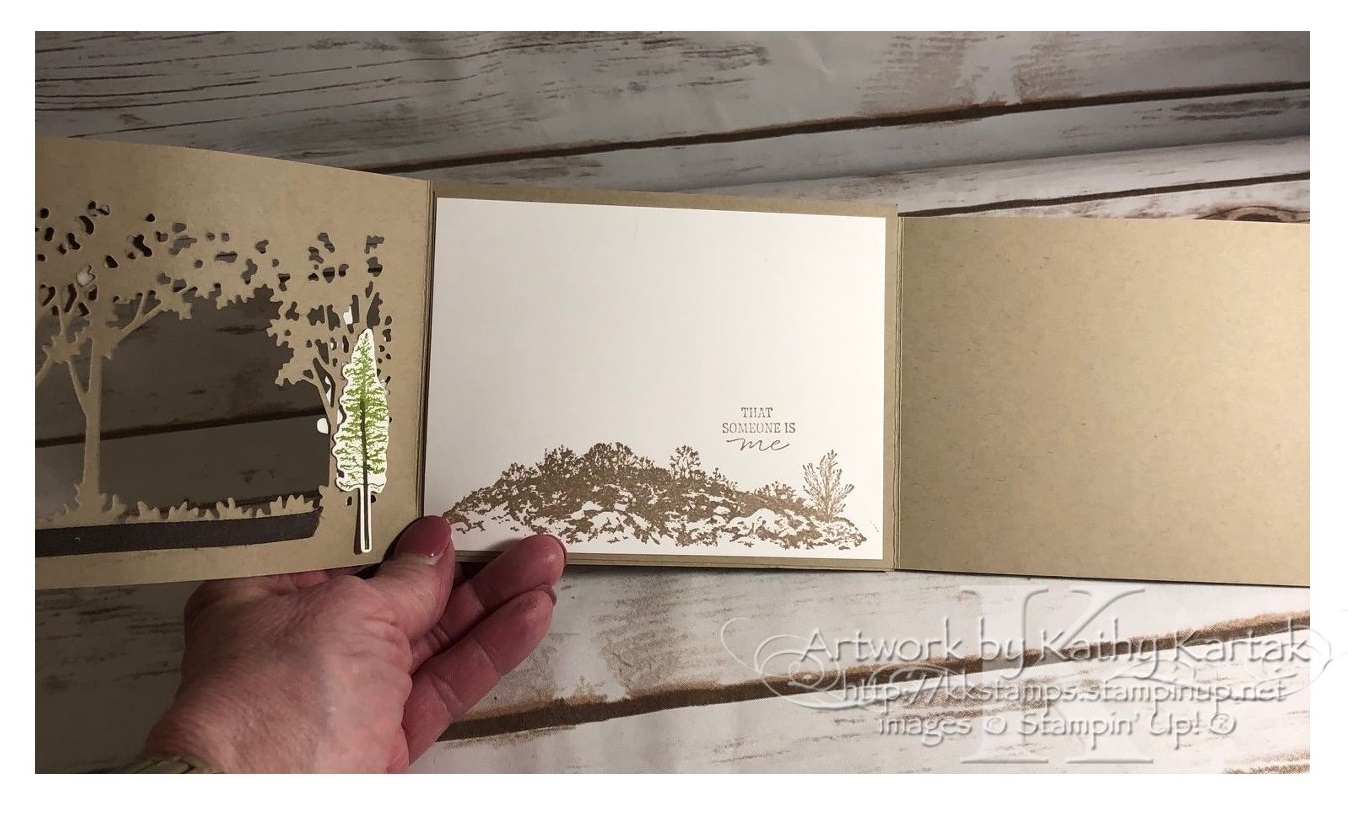
I inked the tall trees stamp in Granny Apple Green and used an Early Espresso Stampin' Write Marker to fill in the trunks. I huffed on the stamp to re-wet it and then stamped it onto Basic White Card Stock. I cut this image out with the matching Grove Die and adhered it to the front of the card with Stampin' Dimensionals. I made another set of trees using this same method, fussy cut one out, and adhered it to the inside of the card so that it covered the backside of the trees and their Dimensionals.

I stamped a sentiment from this set in Early Espresso Ink onto a Crumb Cake scrap and cut it out with a label die from the All That Dies set. I adhered this to the front of the card with Stampin' Dimensionals.          

To finish the front of the card, I adhered a length of Early Espresso Faux Suede Trim along the bottom and tied on a Linen Thread Bow. And I added a few Rustic Metallic Adhesive-Backed Dots to the card.

For the inside, I cut a 4" by 5-1/4" piece of Basic White Card Stock and stamped the hill stamp in Crumb Cake Ink along the bottom. I also stamped the sentiment in Crumb Cake.

Please keep hopping around our blog hop. The next creator is the super fabulous Elizabeth Price. I know you'll love her creation. Please follow our Insta-hop as well. I'm @kkstamper and Liz is @seeinginkspots. The whole team would love it if you'd give us a follow!

See you next month for our August hop!


tams# 72610

Product List
Paper Snips
[103579]
$11.00

Sunday, June 5, 2022

Creation Station: Inspired by Water


 #creationstation   #stampinup   #faithfulinkspirations

Happy June, everyone.  It must be summer 'cause it's hot, hot, HOT here in central Maryland. I have to admit that I'm not the biggest fan of summer (quite the opposite), but I know that a lot of people love the hot and sticky yucky weather--so you can have it! I'll stay here in the A/C and watch all y'all from my window!

This month we're showing you projects that are inspired by water! (That's a good theme for summer--you should drink plenty of water and can cool off in the water...) I thought I'd try a new-to-me technique that I found called "Emboss Resist with Water Bleaching." Water bleaching?! Yeppers! And it's super simple. Let's get started.

I embossed one of the images from the "Nature's Prints" stamp set in Versamark Ink on Basic White Card Stock, sprinkled on Clear Stampin' Emboss Powder, and set it with my Heat Tool. Then I used a Blending Brush and added Soft Succulent Ink to the right side of the card and Evening Evergreen to the left side, overlapping and blending the colors in the middle. I used a paper towel to wipe the ink off the embossed areas of the images. Here's what the emboss resist looks like. Notice that the original colors are still in the leaves of these images.


Next, I used a Water Painter and water (yes, just water) to "bleach" out the images. Because our inks are water-based, the water lifts the color. Here's a close up of the "bleached" Evening Evergreen images.

I cut this piece to 3-3/4" by 5" and adhered it to a 4" by 5-1/4" Evening Evergreen Card Stock Mat. I wanted to use the White 3/4" Frayed Ribbon, but it was too wide...so I cut it in half lengthwise. PROTIP: You don't have to cut it precisely in half because you can fray it until it is the same width. Fun! After adding the ribbon, I adhered everything to a Thick Basic White Card Stock card base.

I stamped a sentiment from the "Nature's Prints" set in Evening Evergreen Ink onto Basic White Card Stock, sprinkled on some Clear Embossing Powder and quickly set it with the Heat Tool. I love to do this to give the sentiment a bit of a sheen. I cut the sentiment piece with one of the Natural Prints coordinating dies from the Sun Prints suite and adhered it to the card with Stampin' Dimensionals. For a finishing touch, I added three Iridescent Rhinestone Basic Jewels. And here's the finished card!

I hope you enjoyed my project and I can't wait to see what Denita Wright Smee has in store for us!

This month we're also doing an Instagram hop. So you can visit me--and follow me--at @kkstamper and then hop to--and follow--@denitawrightsmee on the 'Gram.

Thanks so much for stopping by! See you next month!


Product List
Paper Snips
[103579]
$11.00