#stampinup #creationstation #faithfulinkspirations
Hello and welcome to December! Can you believe this year of years is just about to be over?! Mind you, I don't think that just because the calendar turns from one month to the next, or one year to the next, that anything will change drastically, but I do hope that the future is bright and shiny! And speaking of bright and shiny, our Creation Station blog hop theme is "Ice, Ice Baby" in which we are to create a project that sparkles and shines.
I had fun creating my project. I kept thinking of ways to make my card sparkle and shine. I did some experimenting--some things worked, others didn't, but it was fun spending time being creative. For my card, I went with products from the wonderful Snowflake Splendor Suite on pages 36 through 38 of the July through December Mini Catalog. That was the first Suite that caught my eye when the mini was revealed and I only bought one thing--the entire suite. See, if you use the item number for the entire suite (155115) you get everything in the suite and you don't have to feel bad because you only bought one thing!
Here's the card in all its icy, shiny splendor!
I really pulled out all the stops on this one! My card base is a quarter sheet (4-1/4" by 5-1/2") of Highland Heather Card Stock. I did a fun fold (keep reading for details) with the beautiful Snowflake Splendor Designer Series Paper. I used the So Many Snowflakes Dies to cut the window opening from a piece of Highland Heather Card Stock and to cut the snowflakes. I also used the sparkly Balmy Blue Shimmer Paper (2-7/8" by 4-3/8") and Blue Adhesive-Backed Gems. Oh! I almost forgot--I used the Snowflake Splendor Ribbon as well! I stamped the sentiment from the "Snowflake Wishes" stamp set in Gorgeous Grape Ink directly onto the Snowflake Splendor DSP and embossed it with Clear Embossing Powder to give it a little shine.
I used the Balmy Blue Shimmer Paper and various sheets of the DSP to make the snowflake elements. That's a great way to use up some random DSP pieces. I popped a Blue Adhesive-Backed Gem into the center of each snowflake and on the corners of the sentiment piece.
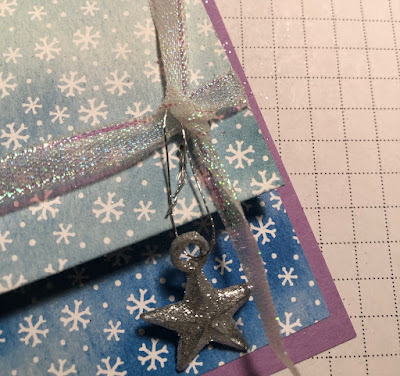
I also tied on a Glitter Star Ornament!
The card has two "insides"--it opens twice! It's so easy to make. Start with an 11-3/4" by 5-1/4" piece of DSP. Score it at 1-3/4", 4-3/4", and 7-3/4", then fold it accordion style. Adhere the 4" by 5-1/4" end to the quarter sheet of card stock.
On the 1-3/4" by 5-1/4" end of the DSP, you'll place the sentiment piece. I adhered it with 4 Stampin' Dimensionals, like this.
Next, you'll wrap about 7" inches of ribbon around the middle folded piece, like this. (This is the back of the middle piece.)
You won't waste ribbon where it won't be seen if you "cheat" it around the back of your card as shown above. The box shows your adhesive placement and you'll fold it over to the left. The front of this piece will look like the next picture and you can use another piece of ribbon slipped underneath to tie on your bow and Glitter Star Ornament.
The first flap of the card opens to reveal another snowflake, the ribbon, and a sentiment piece. I stamped a sentiment from the "Itty Bitty Christmas" stamp set in Balmy Blue Ink onto Whisper White Card Stock and cut it out with one of the Tasteful Label Dies I adhered the sentiment piece with Stampin' Dimensionals.Here's a close-up of the layered snowflake. This time I added in a Balmy Blue Card Stock snowflake for a little variety!
Lift that flap to reveal the second sentiment!
For this one, I used one of the Ornate Layers Dies to cut out another piece of Snowflake Splendor DSP. I stamped a sentiment from the "Snowflake Wishes" Stamp Set in Gorgeous Grape Ink and the snowflakes in Gorgeous Grape and Bermuda Bay Inks directly onto the DSP. Then I "stamped" a Versamark Ink pad directly onto the DSP and embossed the entire front with Clear Embossing Powder. It took a couple of applications, but it's got a nice, icy shine to it. (And if you look at the card when it's closed, you'll see a little bit of the lacy ornate layer peeking out!)
A beautiful card like this deserves a beautiful envelope, so I used another piece of the Snowflake Splendor DSP to line the inside. (I didn't take a picture of that; use your imagination!) When I was inserting the liner into the envelope, the crease tore a bit, so I had to make a creative cover-up...and here's how it turned out!!
I always say, "There are no stampin' mistakes, only stampin' opportunities!"
The card and envelope likely won't make it through the mail, so this one will be hand-delivered along with a Christmas gift, I'm sure!
I hope you've enjoyed my sparkly card and the journey from idea to creation!
Next up is the fabulous Yvonne Spikmans-Van Bruggen at the Creative Teacup blog. I know her project will inspire you!


