Wednesday, August 14, 2019

Woodsy Christmas

#stampinup   #faithfulinkspirations   #ChristmasInAugust   I have a rustic Christmas card to share with you today. It's inspired by a card made by Stampin' Up Artisan Stesha Bloodhart which is truly fabulous in every single way. Mine is a little simpler--but not simple enough for my Christmas card stamp-a-stack, so this card might be a "one and done" kind of card! I like how it turned out. What do you think?
I started by embossing a 3-3/4" by 5" Crumb Cake Card Stock panel with the Woodland Embossing Folder. I adhered this to a 3-3/8" by 5-1/8" Early Espresso Card Stock mat. Next, I stamped the "Buffalo Check" Background stamp in Early Espresso Ink onto a 1-1/2" by 3-3/4" Real Red Card Stock strip. I adhered this to the bottom of the Crumb Cake panel. I wrapped a length of Braided Linen Trim around the checked background, tied on a little bow, and adhered everything to a Crumb Cake Card Stock card base.

See the two trees poking out behind the panel on the card base? Well, I accidentally got my card base into the open Early Espresso Ink and it left a smudge. So, since there are no stampin' mistakes, only stampin' opportunities, I inked up the double tree stamp from the "Rooted in Nature" stamp set and stamped over my smudge...and then I added a second, on purpose, tree to the other side!

I also stamped these double trees in Early Espresso Ink onto Crumb Cake Card Stock and cut them out with their matching Nature's Roots Die. I stamped the word "Christmas" from the "Merry Christmas to All" stamp set in Early Espresso onto Crumb Cake and cut it out with a Stitched Rectangles Die. I adhered these pieces to the card with Stampin' Dimensionals. I used the Merry Christmas Dies to cut out the word "Merry" from a piece of Early Espresso Card Stock. (Bonus Protip: Cut it out of the center of the Early Espresso mat.) I adhered this to the card with the Fine-Tip Glue Pen. (See yesterday's Protip for instructions on unclogging a clogged Fine-Tip Glue Pen.)
Finally, I added a bit of Clear Wink of Stella to the trees and to the word "Merry" because even on my rustic cards, I like some shimmer and shine!


Product List

Tuesday, August 13, 2019

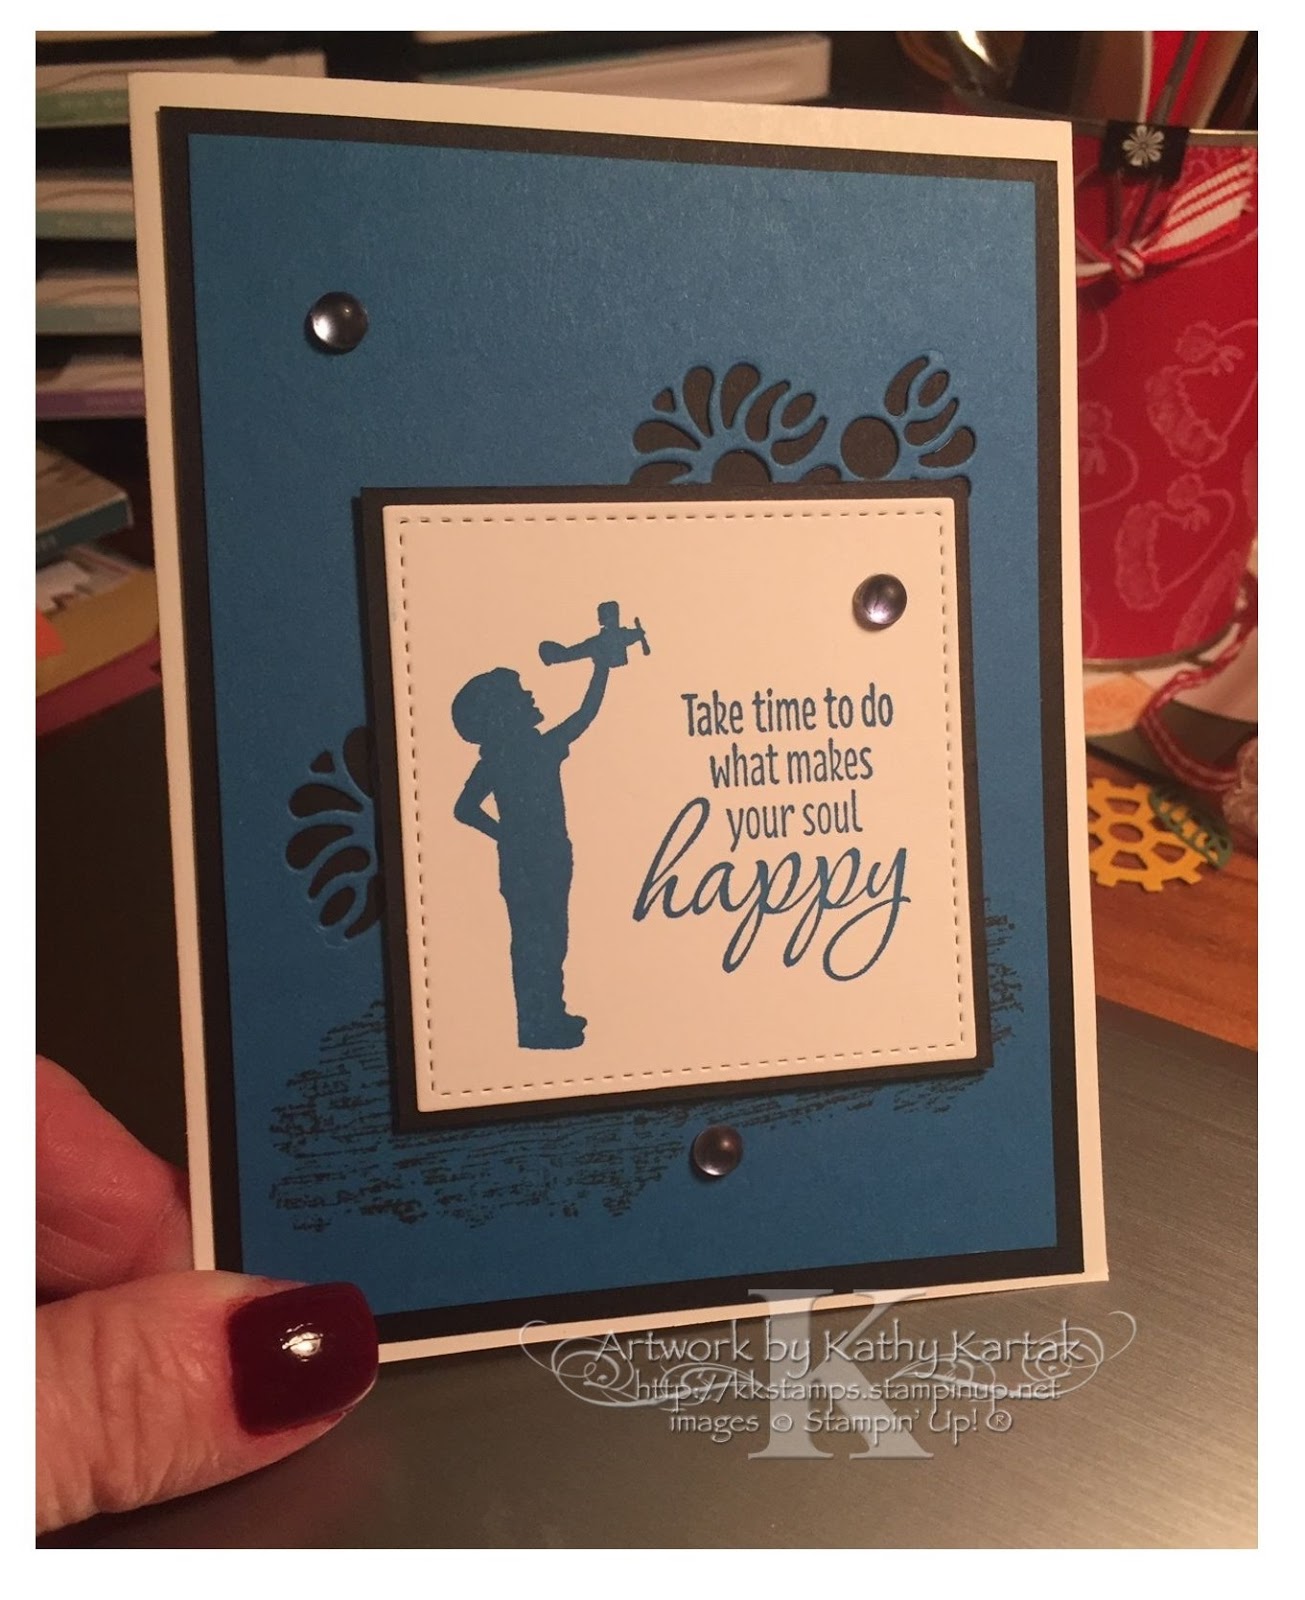
Happy Soul

#stampinup   #faithfulinkspirations   #ProtipTuesday   Hey there! I have a confession to make: my stampin' studio is a mess. It's got boxes everywhere--NEW! product from the Holiday catalog is strewn all over the floor, boxes of retired product are stacked on one of my work tables, and there are birthday presents all over the place. My twins turn 20 this week! Ack! I can't believe it. And they return to college on Friday. If you think my stampin' room sounds messy--you should just try to imagine their rooms. There are clothes all. over. the. floor. of both rooms. It's so bad that you cannot (I kid you not) see the floor. All of those clothes need to be washed and sorted and packed. I'm a little bit panicked.

So I'm taking a bit of time to do what makes my soul happy--and that's creating (which also adds to the mess in my stampin' room). Today's card is one that we made at the Proverbial Stampers & Friends gathering--but that I added some embellishments to it so that I could share the Tuesday Protip with you. (I apologize that the picture is so dark--see the previous paragraph about my studio being a mess--including my photo area.)

We started with a 3-3/4" by 5-1/8" Pacific Point Card Stock panel and cut out the flowers with the Tasteful Backgrounds Dies. We also stamped the smudgy pattern from the "Tasteful Textures" stamp set onto this piece in Memento Tuxedo Black Ink. We adhered this to a 4" by 5-1/4" Basic Black Card Stock mat and then onto a Thick Whisper White Card Stock card base.

Next, we stamped an image from the "Silhouette Scenes" stamp set and a sentiment from the "Tasteful Textures" stamp set in Pacific Point Ink onto Whisper White Card Stock and cut it out with a square Stitched Shapes Die. We adhered that to a Basic Black Card Stock square that we cut with a Layering Squares Die. We adhered this piece to the card with Stampin' Dimensionals.

I added three Frosted Epoxy Droplets to the card and then colored them with a Light Basic Black Stampin' Blend Marker for a little pizzazz.

Let's pretend that the droplets weren't adhesive-backed and let's pretend that we wanted to adhere them to the card with the Fine-Tip Glue Pen. And let's pretend that the Glue Pen was clogged. Do you know how to fix that? If you don't, here's today's Protip for unclogging the Fine-Tip Glue!

The first thing you need to do is unscrew the top from the bottle and then unscrew all four pieces of the top. Next, clear the "goo" off the top of the bottle. I just pick up a piece and it peels right off. Set the bottle aside.

You'll need two special tools for the next steps. First, my special "patent pending" tool (top left) (which can also be used to poke out the hanging chads from your die-cuts if you're too lazy to go get your die brush--ask me how I know) and a straight pin.


Use my special tool to dig out any "goo" (AKA "boogers" from all parts of the components of the top of the glue bottle (top right--see how clogged that piece is?). Next, slowly insert a straight pin into the metal top of the Fine-Tip. You might not be able to do this if the Fine-Tip is clogged. If that's the case, hold the assembly with a pair of tweezers and melt the "goo" with your heat tool. Pump the straight pin in and out of the tip. You may have to repeat the heat-and-pump step a number of times to really clear that Fine-Tip.

I usually blow into the two black pieces and the yellow piece to make sure air can get through--if air can get through, then so can the glue. Use the straight pin to keep the Fine-Tip open, or insert the pin from the white lid into the tip.

And there you have it!

Come on back tomorrow for another entry in the Christmas in August card extravaganza!!


Product List

Monday, August 12, 2019

Seeing Triple

#stampinup   #faithfulinkspirations   #ManicMonday   My, oh my! These cows in the "Over the Moon" stamp set are simply adorable! I love them so much, don't you? And because they're so easy to color, this is the perfect set for a quick card in a hurry for Manic Monday!
We made this card at the Proverbial Stampers & Friends gathering and I was so glad to get my hands on these cows since I don't own this set (yet). We started by stamping the cows three times in Memento Tuxedo Black Ink onto a 2-1/2" by 5-1/4" Whisper White Card Stock panel. Here's a bonus Protip for you: start with the cow in the middle and then stamp either side. This allows you to line them up (almost) perfectly.

After we stamped the cows, we colored them with Light and Dark Crumb Cake, Light Balmy Blue, Light Smoky Slate, Light Old Olive, Light Daffodil Delight, and Dark Basic Black Stampin' Blends. Don't you just love their Balmy Blue rain boots?!

Next, we adhered a 3-1/2" by 5-1/4" piece of Balmy Blue Designer Series Paper from the Neutrals 6" by 6" DSP pack to a Thick Whisper White Card Stock card base. We stamped a sentiment from the "Over the Moon" stamp set in Balmy Blue Ink just beneath the DSP. Then we adhered the stamped panel to the card with Stampin' Dimensionals. 

Simple as pie--a cow pie! Hehehe!


Product List

Friday, August 9, 2019

Artfully Folded

#stampinup   #faithfulinkspirations   #FabulousFriday   Today's adorable card was made by Christine Kurpiel from Reinholds, Pennsylvania. Christine used products from the Follow Your Art Suite on pages 52 through 54 of the annual catalog. And Christine made this card fabulous by using a fun fold!

She started with a standard sheet of Whisper White Card Stock scored it in half lengthwise at 4-1/4" and turned it a quarter turn to score it in half again at 5-1/2". Then she cut the card stock in half, diagonally. She then had two mirror-image pieces that she could use for two cards! How clever is that?!


Christine decorated the inside of the card by stamping images from the "It Starts with Art" and the "Crafting Forever" stamp sets in Calypso Coral, Blushing Bride, and Coastal Cabana. She stamped a sentiment from the "Crafting Forever" set in Pacific Point Ink onto a Whisper White scrap and punched it out with the Pretty Label Punch. She sponged the edges with Crushed Curry Ink and adhered this to the inside of the card with Stampin' Dimensionals. She also cut a cut button shape from Crushed Curry Card Stock using the coordinating Arts & Crafts Dies.

On the outside of the card, Christine added a Crushed Curry Card Stock panel that she embossed with the Button Button Embossing Folder and some more Arts & Crafts die-cut button elements cut from Whisper White, Coastal Cabana, and Calypso Coral Card Stock. She adhered a piece of Follow Your Art Designer Series Paper to the bottom of the card. She stamped a sentiment from the "It Starts with Art" set in Pacific Point Ink directly onto the DSP.

For a finishing touch, she stamped the ribbon spool from the "It Starts with Art" set in Pacific Point onto Whisper White and cut it out with the matching Arts & Crafts Die.

This card and its fun fold are fabulously fun!


Thursday, August 8, 2019

It's Your Day

#stampinup   #faithfulinkspirations   #ThoughtfulThursday   The "A Good Man" stamp set is one I overlooked in the annual catalog. But when we made four cards with this set at the Proverbial Stampers & Friends gathering, I fell in love with it! It's a lovely set if you have men in your life and you'd like to honor them for being good men. 

I particularly like the color scheme and design of this card. It's bold and strong--just like a good man! We started by stamping the main image in Memento Tuxedo Black onto a Whisper White Card Stock oval that had been cut with one of the Stitched Shapes Dies. We colored the image with Crumb Cake, Real Red, Smoky Slate, Blueberry Bushel, and Ivory Stampin' Blends. Then we adhered it to a Real Red scalloped oval cut with one of the Layering Ovals Dies.

To build the card, we started with a Blueberry Bushel Card Stock card base and added a 4" by 5-1/4" Whisper White mat. We stamped a sentiment  and the heart from the "A Good Man" set in Blueberry Bushel Ink. We colored the heart with a Real Red Stampin' Blend. We adhered a 4" by 1-1/2" piece of Blueberry Bushel Designer Series Paper from the 2018-2020 In Color 6" by 6" DSP pack and then wrapped a length of Gray Granite Textured Weave Ribbon around. We adhered this piece to the card base.

Finally, we added the stamped oval piece to the card with Stampin' Dimensionals. So handsome, right?!


Wednesday, August 7, 2019

Merry & Bright

#stampinup   #faithfulinkspirations   #ChristmasInAugust   Since I'm still creating mock-ups of the Christmas cards I might be adding to my stamp-a-stack events, I thought I'd continue "Christmas in July" into August! Let's go!

Today's card is a simple design but it has loads of texture and sparkle. I used the Mosaic Mood Designer Series Paper as a placeholder for the new DSPs that will be in the Holiday Catalog in September, but I think I like this DSP and I think I might just keep it on the card. What do you think?

I embossed a 4" by 5-1/4" Whisper White Card Stock panel with the Curls & Swirls Embossing folder.  I used Stampin' Dimensionals to adhere this to a Thick Whisper White Card Stock card base, cut lengthwise.

I cut a 4" by 2-1/2" strip of Gold Foil Sheet and adhered this to the card. I adhered a 4" by 2" strip of Mosaic Mood DSP to this piece. Next, I cut the "merry" word from a Gold Foil Sheet with one of the Merry Christmas dies. I used the Fine-Tip Glue Pen to adhere this to the card.

I stamped the word "Christmas" from the "Merry Christmas To All" stamp set in Versamark Ink onto a Whisper White scrap. I sprinkled on some Gold Stampin' Emboss Powder and set it with my Heat Tool. I cut this out with the Classic Label Punch--but I think I'll use the die from the Merry Christmas Dies for the "for real" card. I adhered this to the card with Mini Stampin' Dimensionals.

For a final bit of bling, I added four Red Rhinestones to the card.  I really like how this card turned out!


Tuesday, August 6, 2019

Tropical Goodness

#stampinup   #faithfulinkspirations   #ProtipTuesday   Today's card was made by one of my team members, Teresa Murbach. She created it for the Proverbial Stampers & Friends card swap and I think it's adorable. I love the bold colors and design. And Teresa used a technique that I'm happy to share with you because today is Protip Tuesday! 

PROTIP: I like to call this technique "make your own designer series paper background."  Teresa started with a full sheet of Whisper White Card Stock. She used the various stamps in the "Tropical Chic" stamp set and stamped them in Petal Pink, Flirty Flamingo, Granny Apple Green, Shaded Spruce, and Basic Gray all over the entire sheet of card stock. Then she cut the sheet down to 3-3/4" by 5" pieces for her card.

Teresa adhered her "DSP" to a 4" by 5-1/4" Petal Pink Card Stock mat. (Another PROTIP that I've shared with you previously is to cut the scalloped circle piece from the middle of the mat, saving  you some card stock!) Teresa wrapped a length of retired ribbon around her card--but you could use the gorgeous Petal Pink Organdy Striped Ribbon that's current!

Next, she stamped a flower in Petal Pink Ink  and a palm leaf in Granny Apple Green onto Whisper White Card Stock and cut them out with the coordinating Tropic Dies. She stamped a sentiment from the set in Shaded Spruce onto Whisper White and cut it out with a Layering Circles Die. She adhered this to a scalloped Granny Apple Green circle cut with another of the Layering Circles Dies and finally onto a Petal Pink scalloped circle. She adhered this piece and the die-cut elements to the card with Stampin' Dimensionals. So cute!


Monday, August 5, 2019

Tag Time

#stampinup   #faithfulinkspirations   #ManicMonday   Today I have four quick and easy cards all using the "Time for Tags" host stamp set and the same layout. We made these at the Proverbial Stampers & Friends gathering and they're so cute! Take a look.

Let's look at the individual cards. All the cards start with a Thick Whisper White Card Stock card base, cut lengthwise. This one has a 4" by 5-1/4" Granny Apple Green mat that was embossed with the Layered Leaves Embossing Folder. The tag is made from a 2" strip of Pool Party Card Stock, punched with the Scalloped Tag Topper Punch. We stamped a sentiment from the "Time for Tags" stamp set onto the tag in Pool Party Ink. 

Next, we stamped the tag onto Whisper White Card Stock in Memento Tuxedo Black Ink. We colored the image with Light Pool Party, Old Olive, Crumb Cake, and Real Red Stampin' Blends. We punched out the label with the Timeless Label Punch. We adhered the label to the tag with Stampin' Dimensionals and tied on a length of Whisper White Tulle Ribbon before adhering the tag to the card with Stampin' Dimensionals.

The rest of the cards are made with the same design, but have different elements. This card's background mat is Pear Pizzazz that has been embossed with the Tufted Embossing folder. The tag is made with Cajun Craze Card Stock and stamped with Cajun Craze Ink. We stamped the label twice and fussy cut the pineapple--colored with Light Pear Pizzazz and Light & Dark Daffodil Delight Stampin' Blends--and adhered it to the label with Mini Stampin' Dimensionals.

This card has a Calypso Coral Card Stock mat embossed with the Swirls & Curls Embossing Folder. The Crumb Cake tag is punched with the Delightful Tag Topper Punch and the sentiment is stamped with Crumb Cake Ink. We've added a Calypso Coral circle cut with a Stitched Shapes Die. The cake is colored with Light Crumb Cake and Light & Dark Calypso Coral Stampin' Blends.

The final card has a Mango Melody mat embossed with a retired embossing folder. The Purple Posy Card Stock tag is punched with the Delightful Tag Topper Punch and the sentiment is stamped with Purple Posy Ink. We colored the giraffe with Light Daffodil Delight and Dark Purple Posy Stampin' Blends. The label is adhered to the card with Stampin' Dimensionals.

I hope you've enjoyed these sweet quick and easy cards made with the "Time for Tags" set. If you'd like this set, the only way to get it is to host a Stampin' Up event--either a workshop, an online party, or a mini stamp-a-stack or stamp camp. Just let me know what you're thinking and I can get you hooked up!