Here's
how to make this fun, fold-out, snap-up card.
Start with an 8" by 8" sheet card stock and score
it at 4" all the way across. Rotate it a quarter turn and score it
at 4" again. Then score it along one diagonal. Use your bone folder
to get all your edges "crisp."
Next, fold in the sides like this, so the card will lie flat. You'll want to use your bone folder here, too.
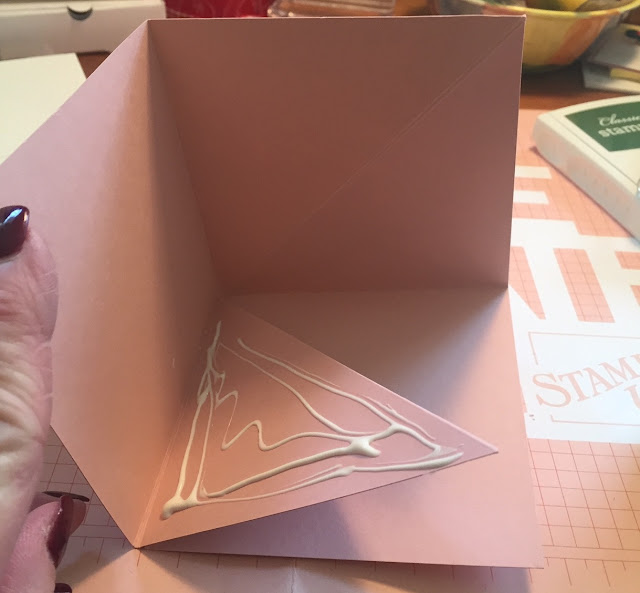
Use Multi-Purpose Liquid Glue to adhere two of the triangles together like this.
And then glue the triangle to one of the sides, like this:
When you've assembled the card base as above, it will look like this.
Cut four 3-3/4" squares of card stock as your mats and adhere two of them to the inside of the card. The third one goes on the diagonally score side and will only be adhered on two sides so that it can fold down when the card is closed.
The fourth 3-3/4" square mat will go on the outside of your card.
Cut four 3-1/2" squares from Whisper White Card Stock and stamp them as desired. Adhere three of these to the inside of the card. The fourth will go on the outside.
I used Glue Dots to adhere a tiny magnet to the inside of the card base and to the back of the stamped image. I used the Classic Label Punch to cut a tab to layer between the magnets and to be a visual cue as to where the card opens and closes.
Decorate the outside of your card as desired.
Create a belly band by cutting Designer Series Paper 1" by 9" and wrap around the outside of the card, adhering the ends.


No comments:
Post a Comment