Friday, June 28, 2019

A Special Thanks

#stampinup   #faithfulinkspirations  It's #FabulousFriday today on the FaithfulINKspirations blog. For my Friday posts, I like to step it up a little bit and take my creations to the "fabulous" level. Today's card is inspired by one shared by Sondra Jumper at our recent Proverbial Stampers & Friends gathering. I used the "Good Morning Magnolia" stamp set and matching Magnolia Morning Dies.
I started with a half sheet of So Saffron Card Stock, cut lengthwise. I used the border die to cut the pretty scallop on the front half. I used the same border die to cut the scallop on the Whisper White piece, too. For that piece, I started with a 4-1/4" by 5-1/2" Whisper White piece and cut the border. After I stamped the images in Memento Tuxedo Black, I adhered it to the So Saffron card front and trimmed the top at the card's fold. I stamped the border design in Tuxedo Black onto the So Saffron card front.

Next, I stamped two of the flowers from the "Good Morning Magnolia" stamp set onto the Whisper White piece that I trimmed from the front of the card. I colored these with Light Daffodil Delight and Light Old Olive Stampin' Blends. (My order for the new So Saffron Stampin' Blend Combo Pack hasn't arrived yet.) I cut these out with their matching Magnolia Morning Die.

I stamped a sentiment from "Good Morning Magnolia" in Versamark Ink onto  1" by 4-1/4" piece of Basic Black Card Stock. I sprinkled on some White Stampin' Emboss Powder and set this with my Heat Tool. I adhered the flowers to the card with Stampin' Dimensionals and then adhered the sentiment strip on top with some more Stampin' Dimensionals.

I stamped the "thanks" sentiment in Versamark onto a 4" by 5-1/4" Basic Black Card Stock panel, sprinkled on some White Stampin' Emboss Powder, and set it with my Heat Tool

I really love how this card turned out and I'm so grateful for Sondra's INKspiration!

Have a wonderful weekend and I'll see you again on Manic Monday!


Product List

Thursday, June 27, 2019

Mosaic Sympathy

#stampinup   #faithfulinkspirations   #ThoughtfulThursday   I'm channeling my inner Patty Bennett--she's one of my stampin' heroes! I've met her once or twice at Stampin' Up events and she's such a lovely person (even though I was fan-girling all over her). Patty recently posted a card that she made with one of the Bird Ballad Laser-Cut Cards and an image that she fussy cut from a sheet of Mosaic Mood Designer Series Paper. I thought Patty's card was genius, so I made one of my own!
I've got to tell you that this card was a perfect storm in the making. In addition to Patty's card, I was inspired by Dori Schneider who presented a demonstration at the Proverbial Stampers & Friends new catalog gathering. Dori showed us several ways to make the most of the Mosaic Mood DSP--including fussy cutting the images. (You can find Dori on Facebook and Pinterest at Stampin' Always with Dori.)

A couple of weeks ago, I posted a card with the same sentiment from the "Painted Glass" stamp set on #ThoughtfulThursday. On that card, I embossed a Very Vanilla Card Stock panel with the Subtle Embossing Folder and then used the Stamparatus to stamp the sentiment several times so the ink would fill in the grooves. Someone asked me what would happen if I stamped first and then embossed, so I tried it. And, honestly, I like it better! So I used that sample "card part" as the label on today's card--and used one of the Stitched NestledLabel Dies to cut it out. I save my "card parts" because they come in handy sometimes. Do you do that?

And then there was Patty's card--so I was triply inspired! For my card, I cut the Petal Pink rose from the Mosaic Mood DSP and I used a 4-1/4" by 5-1/2" Mint Macaron Card Stock mat as the background (glued to the inside of the Bird Ballad Laser-Cut Card--Patty adhered hers to the inside of the card). I adhered the label and the rose to the card with Stampin' Dimensionals.

This cards was so easy to make and it turned out beautifully! Oh! Take a look at the gorgeous scalloped envelope that comes with these cards and the tin! You need these! Just click on the thumbnails below and you'll be taken directly to my online store where you can purchase all the Stampin' Up supplies you need for this card!


Product List
Paper Snips
[103579]
$10.00

Wednesday, June 26, 2019

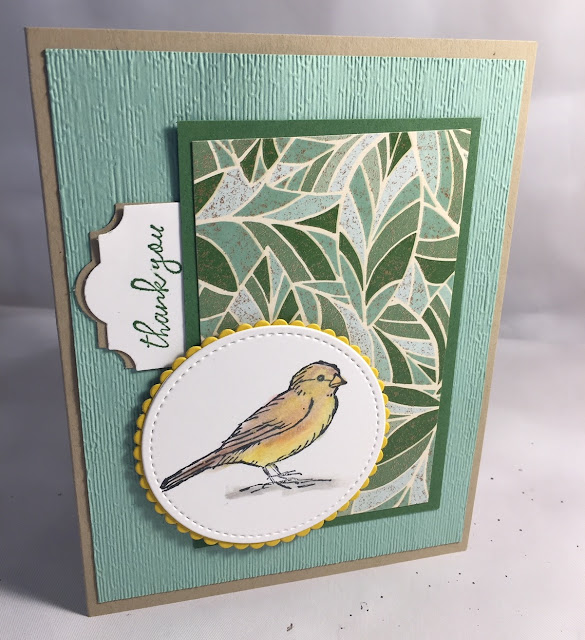
My Little Chickadee

#stampinup   #faithfulinkspirations   #ChallengeWednesday   #CTS327   Hey there! I'm excited to be playing along in a sketch challenge this week. The challenge blog is CAS(E) This Sketch. You may know that "CASE" means to "copy and steal share everything" and that "CAS" means "clean and simple." This blog cleverly puts together both concepts. Here's the sketch for this week's challenge.

 
I spent a little while thinking up a design for the challenge and I had a few fits and starts, but I think the final card is one of my favorites. I knew I was going to use a bit of my favorite Mosaic Mood Designer Series Paper and I thought I was going to fussy cut one of the designs from that DSP, too. But that didn't work out so I did something a little different.

I started with a 2-1/2" by 4" piece of Mosaic Mood DSP and adhered it to a 2-3/4" by 4" Garden Green Card Stock mat. Next, I embossed a 4" by 5-1/4" Mint Macaron Card Stock panel with the Subtle Embossing Folder. I adhered this to a Crumb Cake Card Stock card base and adhered the DSP piece on top.

I initially stamped a sentiment from another stamp set in Crumb Cake Ink onto Crumb Cake Card Stock and punched it out with the Everyday Label Punch. I tucked this under the DSP piece and adhered it to the card. But I didn't like it. 

So, I pulled out the "Free as a Bird" stamp set. I stamped the bird in Memento Tuxedo Black Ink onto Thick Whisper White Card Stock. On the side, I made a palette of Watercolor Pencil colors by laying down some scribbles. I used Basic Gray, Daffodil Delight, Early Espresso, Pumpkin Pie, and Calypso Coral. I picked up the colors with a Blender Pen to color my chickadee. I like to use the Thick Whisper White for this technique because it stands up to the Blender Pen and will take a little bit of blending without pilling or tearing.


I cut out the bird with a circle Stitched Shape Die and adhered it to a scalloped Daffodil Delight circle that I cut with one of the Layering Circles Dies. I adhered this to the card with Stampin' Dimensionals.

I then stamped a sentiment from the "Free as a Bird" stamp set in Garden Green onto a Whisper White scrap and punched it out with the Pretty Label Punch. I slipped this under the DSP piece and used a bit of the original Crumb Cake tag as a mat. There. Much better, don't you think?


Tomorrow is Thoughtful Thursday and I have a wonderful card for you, so come on back!


Product List
Blender Pens
[102845]
$12.00

Tuesday, June 25, 2019

Cake Is the Answer!

#stampinup   #faithfulinkspirations   #ProTipTuesday   Today's card is inspired by a swap card I received from Karen Mullins at the Proverbial Stampers & Friends new catalog event. I love the way Karen paired the "Piece of Cake" stamp set with the colors of the striped sheet of Bird Ballad Designer Series Paper.

Karen stamped the two elements of the cake from the "Piece of Cake" stamp set in Memento Tuxedo Black Ink onto Whisper White Card Stock. She colored these with Light and Dark Smoky Slate, Light Petal Pink, Light Balmy Blue, Light Old Olive, Light Calypso Coral, and Dark Daffodil Delight Stampin' Blends. Then she punched out the pieces with the Cake Builder Punch.

Karen cut a Whisper White label with one of the Stitched Nestled Labels Dies and a just-larger Daffodil Delight label with another of the dies. She stamped a heart from the "Piece of Cake" stamp set in Tuxedo Black and colored it with a Dark Petal Pink Stampin' Blend. She adhered the cake pieces to the label with Stampin' Dimensionals.

For my card, I cut a 3-5/8" by 4-1/4" Pool Party Card Stock panel and adhered a 1-1/4" by 4" piece of the striped Bird Ballad DSP. I adhered the label assembly to this piece with Stampin' Dimensionals and tied on a length of Whisper White Polka Dot Tulle Ribbon. 

Here's your ProTip: Why waste beautiful ribbon by wrapping it behind the layer that you won't see? Instead, I use my card stock piece as a measure and cut my ribbon slightly longer than that piece.

Then I flip the card stock over and lay down a little bit of adhesive--or all your adhesive, around all sides, if you're ready to adhere the piece--and fold over the ends of the ribbon.

Then I snip a 2"-4" length of the same ribbon, depending on how big I want the bow, and slip it under the ribbon on the front of the card, and tie it in a knot right on top! You can then slide your bow into whatever position you want.

This is probably my favorite ProTip of all time--I use it on every card that has ribbon!

To finish my card, I cut a 3-5/8" by 5" Calypso Coral Card Stock panel and adhered it directly to a Thick Whisper White Card Stock card base, cut lengthwise. I adhered the finished Pool Party panel right on top of that! I stamped a sentiment from the "Piece of Cake" set in Smoky Slate Ink onto a Whisper White scrap and punched it out with the Classic Label Punch. I adhered this to the card with Mini Stampin' Dimensionals. So easy and so cute!

Tomorrow is Challenge Wednesday, so come on back and see what challenge I'm playing along with!


Product List